Eljan Simuratli
1/30/2025
Mastering LinkedIn Data Extraction: Build a Chrome Extension to Scrape User Details - An Advanced Guide

Step 1: Embedding Content Scripts into LinkedIn with a Custom Chrome Extension
First, we need to create the extension itself after that we will apply scraping logic. If you know how to create an extension, skip this part.
I call my tool extensioznblog you can call anything you want
npx create-react-app extensionblog --template typescriptThe react project is ready now let’s convert it to an extension. For that we need:
First, our manifest is:

manifest.json
{
    "version": "1.0.0",
    "manifest_version": 3,
    "name": "LN Scraper",
    "description": "Ln scraper is for scraping user data from Linkedin",
    "short_name": "U-Scraper",
    "author": "Eljan Simuratli",
    "content_scripts": [
      {
        "matches": ["https://www.linkedin.com/*"],
        "js": ["contentScript.js"]
      }
    ],
    "host_permissions": ["https://www.linkedin.com/*"],
    "permissions": ["tabs", "webNavigation", "cookies"],
    "background": {
      "service_worker": "background.js"
    },
    "icons": {
      "16": "images/uscrapericon.png",
      "48": "images/uscrapericon.png",
      "128": "images/uscrapericon.png"
    }
  }
Note: We need “tabs”, “webNavigation”, “cookies” permissions and also host permission for allowing content script usage cookies and sending requests for achieving data.
This part shows the user content script file.
"content_scripts": [
    {
      "matches": ["https://www.linkedin.com/*"],
      "js": ["contentScript.js"]
    }
  ],
Our content script file is called contentScript.js and it is placed in the main folder which is why we use it like that. if it is placed in like content folder it will be like this: ”js”: [“content/contentScript.js”] . We will declare the folder structure in webpack.config.js .
Creating Content Script and Background folder and files.
Create a background folder and add it background.ts file.

For the content script, I will use the React app as a content script. Just create the basic structure of the React app inside content-scriptthe folder.
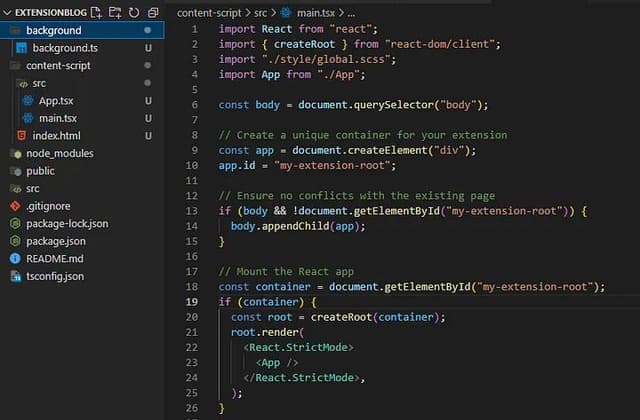
inside src of the content script, you can use any folder for example store for your state management, components folder style folder, etc. whatever you want App.tsx and main.tsx. Here App js will be the same as normal react app. but main.ts will be a little bit different.
import React from "react";
import { createRoot } from "react-dom/client";
import "./style/global.scss";
import App from "./App";

const body = document.querySelector("body");

// Create a unique container for your extension
const app = document.createElement("div");
app.id = "my-extension-root";

// Ensure no conflicts with the existing page
if (body && !document.getElementById("my-extension-root")) {
  body.appendChild(app);
}

// Mount the React app
const container = document.getElementById("my-extension-root");
if (container) {
  const root = createRoot(container);
  root.render(
    <React.StrictMode>
      <App />
    </React.StrictMode>,
  );
}
That is it for the content script file.
Creating Webpack file:
npm i html-webpack-plugin copy-webpack-plugin ts-loaderconst path = require("path");
const HTMLPlugin = require("html-webpack-plugin");
const CopyPlugin = require("copy-webpack-plugin");
module.exports = {
 entry: {
    index: "./src/index.tsx",
    // Add an entry point for the background script
    background: "./background/background.ts",
    contentScript: "./content-script/src/main.tsx", // Ensure this is the correct path to your background script
},
mode: "production",
module: {
rules: [
{
test: /\.tsx?$/,
use: [
{
loader: "ts-loader",
options: {
compilerOptions: { noEmit: false },
},
},
],
exclude: /node_modules/,
},
{
exclude: /node_modules/,
test: /\.css$/i,
use: ["style-loader", "css-loader"],
},
{
test: /\.scss$/, // Add SCSS rule
use: [
"style-loader", // Injects styles into DOM
"css-loader", // Turns CSS into CommonJS modules
"sass-loader", // Compiles Sass to CSS
],
exclude: /node_modules/,
},
],
},
plugins: [
    new CopyPlugin({
      patterns: [
        { from: "manifest.json", to: "./" }, // Copy manifest.json to the root of dist
        {
          from: "public/images", // Only copy images from the 'public/images' folder
          to: "images", // Copy them to the 'dist/images' folder
        },
      ],
    }),
    ...getHtmlPlugins(["index"]),
  ],
resolve: {
extensions: [".tsx", ".ts", ".js"],
},
output: {
    path: path.join(__dirname, "dist"),
    filename: "[name].js", // This will create index.js and serviceWorker.js in dist
},
};
function getHtmlPlugins(chunks) {
return chunks.map(
(chunk) =>
new HTMLPlugin({
title: "React extension",
filename: `${chunk}.html`,
chunks: [chunk],
}),
);
}Here we declare entry points and output naming for background content script and index file:
entry: {
index: "./src/index.tsx",
// Add an entry point for the background script
background: "./background/background.ts",
contentScript: "./content-script/src/main.tsx", // Ensure this is the correct path to your background script
}Here we declare the manifest file and folder for images
plugins: [
new CopyPlugin({
patterns: [
{ from: "manifest.json", to: "./" }, // Copy manifest.json to the root of dist
{
from: "public/images", // Only copy images from the 'public/images' folder
to: "images", // Copy them to the 'dist/images' folder
},
],
}),
...getHtmlPlugins(["index"]),
],
Note: if you don't have this folder it returns an error during the build as you see in manifest.json your image name is uscrapeicoin.png
This part shows the output folder of our output location:
output: {
path: path.join(__dirname, "dist"),
filename: "[name].js", // This will create index.js and serviceWorker.js in dist
},Let’s go back to App.tsx the content script folder.
import React from 'react'

const App = () => {
  return (
    <div className='myExtensionClass'>
      I am your content script
    </div>
  )
}

export default App
we have .myExtensionClass and let’s add style for seeing it on LinkedIn.
I will use scss and that is why.
npm i sass.myExtensionClass{
width: 500px;
height: 100vh;
background-color: orange;
position: fixed;
z-index: 10203;
right: 0;
top: 0;
transition: 0.2s ease-in-out;
box-shadow: 0px 10px 15px -3px rgba(0, 0, 0, 0.1);
}Let’s go to the package.json inside scripts
 "scripts": {
    "start": "react-scripts start",
    "build": "webpack --config webpack.config.js",
    "watch": "webpack -w --config webpack.config.js",
    "test": "react-scripts test",
    "eject": "react-scripts eject"
  },
Let’s build it now using
npm run buildDuring building if you see this error:

You can solve this by going to tsconfig.ts and changing the target to higher than es5 “target”: “ES2020”
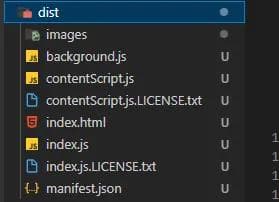
After build you will see everything is successful and new dist folder created:
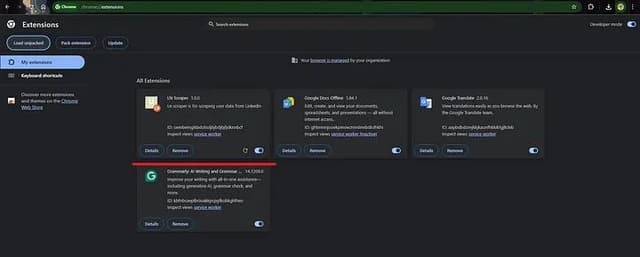
Now in your Chrome browser go to:
chrome://extensions/Activate a developer mode:
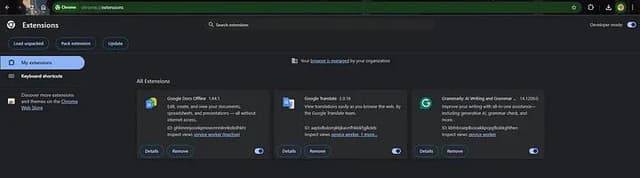
You will see the “Load unpacked” button. Click on it, select your dist folder, and voilà—your extension is ready to use and enhance!
To see how it works, simply navigate to a LinkedIn page (or reload if you already have LinkedIn open), and you will notice:
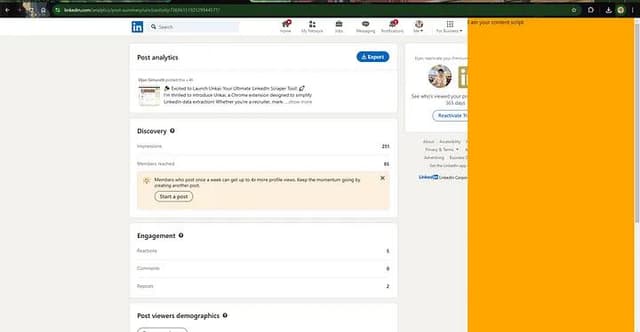
Note: The main focus of this article is to explain how to create a Chrome extension, use React.js as a content script, and scrape data from LinkedIn, so I will skip styling and other additional details.
Scraping data from LinkedIn:
For that first, we need to understand background js: Imagine it as the brain of your Chrome extension that works behind the scenes. It doesn’t show up on the webpage but keeps everything running smoothly. It listens for events, like when you click a button or open a new tab, and decides what the extension should do next.
For example, if your extension needs to send data from a webpage to a database, background.js makes sure it happens. It also helps different parts of your extension, like popups and content scripts, talk to each other. Think of it as the middleman keeping everyone connected and on the same page!
Open chrome://extensions/ you will see service worker link of our extension:
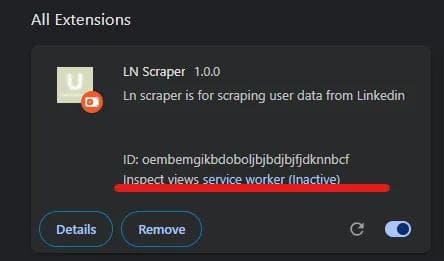
When you click it you will see console tab will be opened:
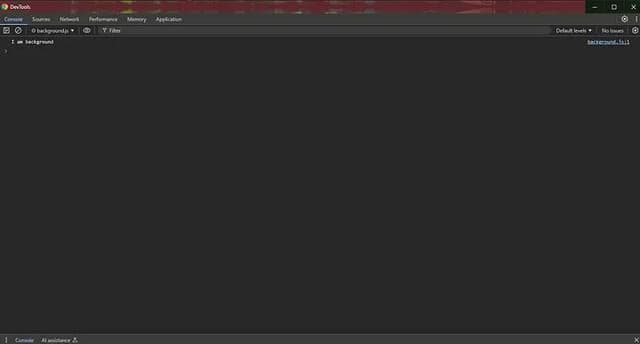
as you see our background js is working because if you remember we added console.log to our background file.
Let’s start editing it. We user typescript let’s define interface which data we want to take and interface for LinkedinApiService:
interface ProfileData {
  firstName?: string;
  lastName?: string;
  headline?: string;
  company?: string;
  email?: string;
  publicIdentifier?: string;
}

interface LinkedInAPIResponse {
  included: any[];
  data: any;
}
This class, LinkedInAPIService, is a helper to interact with LinkedIn's API and get user profile data. Think of it like a translator that speaks the language of LinkedIn's backend so we can ask for the information we need.
Classes are a template for creating objects.
- Getting Cookies from LinkedIn
To access LinkedIn’s API, we need cookies from the user’s browser session. Cookies contain authentication and session information that LinkedIn uses to verify requests.
private async getCookiesFromTab(
  tabId: number,
): Promise<{ [key: string]: string }> {
  const cookies = await chrome.cookies.getAll({
    url: "https://www.linkedin.com",
  });
  return cookies.reduce(
    (acc, cookie) => {
      acc[cookie.name] = cookie.value;
      return acc;
    },
    {} as { [key: string]: string },
  );
}chrome.cookies.getAll: Retrieves all cookies for LinkedIn.
reduce Function: Transforms the list of cookies into an easy-to-use object format: {cookieName: cookieValue}.
2. Formatting Cookies
Once we have the cookies, we need to convert them into a format that LinkedIn’s API expects: a single string with name=value pairs separated by semicolons.
private formatCookies(cookies: { [key: string]: string }): string {
  return Object.entries(cookies)
    .map(([name, value]) => `${name}=${value}`)
    .join("; ");
}
Explanation:
Object.entries: Converts the cookie object into an array of key-value pairs.
map and join: Creates a properly formatted cookie string.
3. Building API Request Headers
Headers contain metadata about our API requests. LinkedIn requires specific headers, including a CSRF token for security and the formatted cookies.
private getHeaders(
  csrfToken: string,
  cookies: { [key: string]: string },
): Headers {
  return new Headers({
    accept: "application/vnd.linkedin.normalized+json+2.1",
    "csrf-token": csrfToken,
    "x-li-lang": "en_US",
    "x-restli-protocol-version": "2.0.0",
    "x-li-track": '{"clientVersion":"1.12","mpVersion":"1.12"}',
    cookie: this.formatCookies(cookies),
  });
}
CSRF Token: Prevents unauthorized requests (like protecting your bank from hackers).
Formatted Cookies: Used to authenticate the user.
Other Headers: Tell LinkedIn how we want the data and who’s making the request.
4. Sending API Requests
This function sends an HTTP request to LinkedIn’s API and handles errors if the request fails.
private async makeRequest(url: string, headers: Headers): Promise<any> {
  const response = await fetch(url, {
    headers,
    credentials: "include",
  });

  if (!response.ok) {
    throw new Error(`LinkedIn API Error: ${response.status}`);
  }

  return response.json();
}
Explanation:
fetch: Sends the request to LinkedIn.
credentials: "include": Ensures cookies are sent with the request for authentication.
Error Handling: If the server responds with an error, we throw an exception.
5. Fetching Profile and Contact Data
This method ties everything together. It retrieves cookies, builds headers, sends API requests, and processes the data.
async fetchProfileData(
  profileId: string,
  tabId: number,
): Promise<ProfileData> {
  try {
    const cookies = await this.getCookiesFromTab(tabId);
    const csrfToken = cookies["JSESSIONID"]?.replace(/"/g, "");

    if (!csrfToken) {
      throw new Error(
        "CSRF token not found. Please make sure you are logged into LinkedIn.",
      );
    }

    const headers = this.getHeaders(csrfToken, cookies);

    const profileUrl = `https://www.linkedin.com/voyager/api/identity/profiles/${profileId}/profileView`;
    const profileResponse: LinkedInAPIResponse = await this.makeRequest(
      profileUrl,
      headers,
    );

    const contactUrl = `https://www.linkedin.com/voyager/api/identity/profiles/${profileId}/profileContactInfo`;
    const contactResponse: LinkedInAPIResponse = await this.makeRequest(
      contactUrl,
      headers,
    );

    return this.processAPIResponse(profileResponse, contactResponse);
  } catch (error) {
    console.error("Error fetching LinkedIn data:", error);
    throw error;
  }
}
Fetch Cookies and CSRF Token: Ensures the user is logged in and authorized.
Build Headers: Prepares metadata for the request.
Make API Requests: Fetches profile and contact data using LinkedIn’s endpoints.
Process Data: Combines and structures the data for easy use.
6. Processing API Responses
Finally, we parse and clean up the raw API data into a structured object (ProfileData).
  private processAPIResponse(
    profileResponse: LinkedInAPIResponse,
    contactResponse: LinkedInAPIResponse,
  ): ProfileData {
    const included = profileResponse.included || [];
    const contactInfo = contactResponse.data || [];
    const profileData: ProfileData = {};

    // Process basic profile information
    for (const item of included) {
      if (item.firstName) profileData.firstName = item.firstName;
      if (item.lastName) profileData.lastName = item.lastName;
      if (item.headline) profileData.headline = item.headline;
      if (item.address) profileData.adress = item.adress;
      if (item.summary) profileData.summary = item.summary;
      if (item.birthDate)
        profileData.birthDate = `${item.birthDate.day}/${item.birthDate.month}`;

      if ("miniCompany" in item || "*miniCompany" in item) {
        const numberSplit = item.entityUrn.split(",")[1];
        if (numberSplit.split(")")[0] === "0") {
          profileData.company = item.name;
        }
      }
      if (item.publicIdentifier)
        profileData.publicIdentifier = item.publicIdentifier;
    }

    // Process contact information

    if (contactInfo.phoneNumbers && contactInfo.phoneNumbers.lenght !== 0) {
      for (const item of contactInfo.phoneNumbers) {
        profileData[item.type] = item.number;
      }
    }

    if (contactInfo.emailAddress) profileData.email = contactInfo.emailAddress;

    return profileData;
  }
Explanation:
- Loop Through Data: Extracts relevant fields like name, headline, and email.
- Combine Responses: Merges basic profile info with contact info.
- Clean Output: Ensures the data is easy to read and use.
Our Background code looks like this now:
interface ProfileData {
  firstName?: string;
  lastName?: string;
  headline?: string;
  company?: string;
  email?: string;
  publicIdentifier?: string;
}

interface LinkedInAPIResponse {
  included: any[];
  data: any;
}

chrome.webNavigation.onHistoryStateUpdated.addListener(
  (details) => {
    // Send a message to the content script with the new URL
    chrome.tabs.sendMessage(details.tabId, { type: "PAGE_UPDATED" });
  },
  { url: [{ urlMatches: ".*" }] },
);

class LinkedInAPIService {
  private async getCookiesFromTab(
    tabId: number,
  ): Promise<{ [key: string]: string }> {
    const cookies = await chrome.cookies.getAll({
      url: "https://www.linkedin.com",
    });
    return cookies.reduce(
      (acc, cookie) => {
        acc[cookie.name] = cookie.value;
        return acc;
      },
      {} as { [key: string]: string },
    );
  }

  private getHeaders(
    csrfToken: string,
    cookies: { [key: string]: string },
  ): Headers {
    return new Headers({
      accept: "application/vnd.linkedin.normalized+json+2.1",
      "csrf-token": csrfToken,
      "x-li-lang": "en_US",
      "x-restli-protocol-version": "2.0.0",
      "x-li-track": '{"clientVersion":"1.12","mpVersion":"1.12"}',
      cookie: this.formatCookies(cookies),
    });
  }

  private formatCookies(cookies: { [key: string]: string }): string {
    return Object.entries(cookies)
      .map(([name, value]) => `${name}=${value}`)
      .join("; ");
  }

  private async makeRequest(url: string, headers: Headers): Promise<any> {
    const response = await fetch(url, {
      headers,
      credentials: "include",
    });

    if (!response.ok) {
      throw new Error(`LinkedIn API Error: ${response.status}`);
    }

    return response.json();
  }

  async fetchProfileData(
    profileId: string,
    tabId: number,
  ): Promise<ProfileData> {
    try {
      const cookies = await this.getCookiesFromTab(tabId);
      const csrfToken = cookies["JSESSIONID"]?.replace(/"/g, "");

      if (!csrfToken) {
        throw new Error(
          "CSRF token not found. Please make sure you are logged into LinkedIn.",
        );
      }

      const headers = this.getHeaders(csrfToken, cookies);

      // Fetch basic profile data
      const profileUrl = `https://www.linkedin.com/voyager/api/identity/profiles/${profileId}/profileView`;
      const profileResponse: LinkedInAPIResponse = await this.makeRequest(
        profileUrl,
        headers,
      );

      // Fetch contact info
      const contactUrl = `https://www.linkedin.com/voyager/api/identity/profiles/${profileId}/profileContactInfo`;
      const contactResponse: LinkedInAPIResponse = await this.makeRequest(
        contactUrl,
        headers,
      );

      return this.processAPIResponse(profileResponse, contactResponse);
    } catch (error) {
      console.error("Error fetching LinkedIn data:", error);
      throw error;
    }
  }

  private processAPIResponse(
    profileResponse: LinkedInAPIResponse,
    contactResponse: LinkedInAPIResponse,
  ): ProfileData {
    const included = profileResponse.included || [];
    const contactInfo = contactResponse.data || [];
    const profileData: ProfileData = {};

    // Process basic profile information
    for (const item of included) {
      if (item.firstName) profileData.firstName = item.firstName;
      if (item.lastName) profileData.lastName = item.lastName;
      if (item.headline) profileData.headline = item.headline;
      if (item.address) profileData.adress = item.adress;
      if (item.summary) profileData.summary = item.summary;
      if (item.birthDate)
        profileData.birthDate = `${item.birthDate.day}/${item.birthDate.month}`;

      if ("miniCompany" in item || "*miniCompany" in item) {
        const numberSplit = item.entityUrn.split(",")[1];
        if (numberSplit.split(")")[0] === "0") {
          profileData.company = item.name;
        }
      }
      if (item.publicIdentifier)
        profileData.publicIdentifier = item.publicIdentifier;
    }

    // Process contact information

    if (contactInfo.phoneNumbers && contactInfo.phoneNumbers.lenght !== 0) {
      for (const item of contactInfo.phoneNumbers) {
        profileData[item.type] = item.number;
      }
    }

    if (contactInfo.emailAddress) profileData.email = contactInfo.emailAddress;

    return profileData;
  }
}
Now we must initialize the service
// Initialize the service
const linkedInService = new LinkedInAPIService();
Now we must create a connection between content script and background js for that we use chrome.runtime.onMessage.addListener
 chrome.tabs.onUpdated.addListener((tabId, changeInfo, tab) => {
    if (
      changeInfo.status === "complete" &&
      tab.url?.includes("linkedin.com/in/")
    ) {
      // Extract profile ID from URL
      const profileId = tab.url.match(/\/in\/([^/]+)/)?.[1];
      if (profileId) {
        linkedInService
          .fetchProfileData(profileId, tabId)
          .then((profileData) => {
            chrome.tabs.sendMessage(tabId, {
              type: "PROFILE_DATA_RESULT",
              data: profileData,
            });
          })
          .catch((error) => {
            chrome.tabs.sendMessage(tabId, {
              type: "PROFILE_DATA_ERROR",
              error: error.message,
            });
          });
      }
    }
  });
now from here, you can understand we get id of the user with:
const profileId = tab.url.match(/\/in\/([^/]+)/)?.[1];For example, if URL is: https://www.linkedin.com/in/simuratli/ it return us simuratli .
After that using fetchProfileData we get results and using this we send a message to the content script:
chrome.tabs.sendMessage(tabId, {
  type: "PROFILE_DATA_RESULT",
  data: profileData,
});
Now let’s go to the content script and get a message. Inside App.tsx of content script we will add:
useEffect(() => {
    const messageListener = (message: { type; data; error; }) => {
      if (message.type === "PROFILE_DATA_RESULT") {
        console.log('WE RECEIVE DATA', message.data)
        // You can send this to your React component or process it further
      } else if (message.type === "PROFILE_DATA_ERROR") {
        console.error("Error fetching profile data:", message.error);
      }
    };
    chrome.runtime.onMessage.addListener(messageListener);

    return () => {
      chrome.runtime.onMessage.removeListener(messageListener);
    };
  }, []);

  return (
    <div className='myExtensionClass'>
      I am your content script
    </div>
  )
}
That’s it! As before, simply build the project, reupload the dist folder to Chrome, and navigate to a LinkedIn user page. Open the console, and you’ll see the results.

My LinkedIn scraping extension is: Here
Connect with me: Linkedin